Hello everyone,
As with many members on here, I figure I should document my (slow) cafe racer build and maybe get your guys opinion along the way on a few things. I love getting inspiration from others builds and a lot of the things that I do to my bike come from other great members out there.
First a little back story: For as long as I can remember I've always wanted a motorcycle, but never had the money to get one. Last year I was searching the web when this 1980 cx500 custom caught my eye. What a cool looking bike I thought. Long story short I went and picked up my first ever bike and I was so happy. Got it for $250, and knew I had lots to do, starting off with replacing the stator. (Also the PO did not have the ownership and it was an american bike....that took a while to get worked out lol) Fixed it up and it ran great after a little tuning. At that point in time i just wanted to have a bike to ride so I didn't do much to make it look pretty, but now that i have a bit of extra cash (I don't really lol) I want to get it running better and looking fantastic.
Index
Page 1: Background, front fork rebuild, front fender chop, clip-on handlebars, new exhaust wrap and mufflers, new headlight and front signals.
Page 2: New engine new temperature gauge.
Page 3: Painted engine tags and clutch cover.
Page 4: New temperature sending unit.
Page 5: Radiator guard design.
Page 6: Engine paint prep, gauge design and radiator guard fabrication.
Page 7: Dummy lights and gauge redesign
Page 8: Muffler repacking, new tachometer and speedometer, engine painting, engine guards and shock painting, frame touch-up and engine mounting.
Page 9: E-fan mounting and wiring.
Page 10: Redesigned e-fan mounting and steering limits.
Page 11: Gauge and dummy lights wiring and gauge mounting brackets fabrication.
Page 12: Gauge brackets redesign and fabrication.
Page 13: Gauge brackets painting, dummy lights mounting, gauge mounting, lights testing and carb cleaning.
Page 14: Bike startup and oil leak.
Page 15: Cylinder cover painting and test drive.
Page 17: Rim tape installation.
Page 18: Bike drawing start, LED strip testing and tank designs.
Page 19: Rear fender and licence plate holder design.
Page 20: Tank designs, rear fender redesign, bike disassembly and tire hugger design.
Page 21: Tire hugger design and brake light switch bracket fabrication.
Page 22: Battery box design and fabrication.
Page 23: Battery box fabrication and painting and rear fender support tubes fabrication.
Page 25: Rear fender support tubes and rear fender fabrication.
Page 26: Rear fender fabrication.
Page 27: Rear fender mounting bracket fabrication and start of rear fender assembly.
Page 28: Rear fender assembly, test fit and more fabrication.
Page 29: Licence plate bracket design and fabrication, final rear fender assembly, turn signal testing/concept and rear frame modifications.
Page 30: More rear light ideas.
Page 31: Rear hoop and signal mounts fabrication.
Page 32: Rear hoop fabrication continued, new shocks and signal test fit.
Page 34: Rear hoop mock-up, shock limiters, rear hoop modification, rear fender mounting bracket clean up, front electronic pan fabrication.
Page 35: Rear electrical pan fabrication, license plate bracket fabrication and rear fender test fit.
Page 36: Licence plate lights, regulator and starter solenoid mounting and wiring and rear tire hugger fabrication.
Page 39: Rear brake pad replacement, rear hub painting, frame clean up and welding in rear hoop.
Page 40: Priming and painting frame.
Page 41: Getting tire hugger and rear fender ready for painting.
Page 42: Rear fender inside coating.
Page 43: Rear fender and license plate painting, new shock spring coating, shock assemble and install and rear fender, tire hugger and turn signal mounting.
Page 45: 12 Volt time delay modules.
Page 46: Wiring and painting of rear tire hugger and electrical pans.
Page 47: Mounting tire hugger and electrical pans and wiring battery and starter solenoid.
Page 48: Cleaning up electronics and wiring rear turn signals.
Page 49: Pod filters.
Page 50: Header breather tubes and front fork stiffness modifications.
Page 51: New LED brake and running light.
Page 52: Brake flasher module.
Page 53: Brake light mounting and electronic testing.
Page 55: Tire choices.
Page 57: Disc lock.
Page 58: Final Tank designs.
Page 60: Seat pan mock up and fabrication.
Page 62: Changing tires and paint supplies.
Page 63: Tank stripping and seat upholstered.
Page 64: Priming gas tank and new ignition switch.
Page 65: Painting gas tank.
Page 67: Wet sanding tank.
Page 68: Fixing tank mistake, building ignition switch, final 2K clear coat on tank and buffing/polishing tank.
Page 69: Bike pictures and tire hugger mounting clarification.
Page 70: More bike pictures.
Anyways, here are some pictures from before:
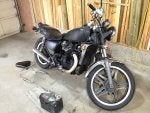
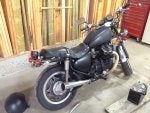
How it looked when I bought it:
![]()
![]()
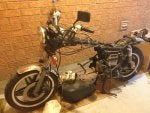
First time taking the engine out:
![]()
![]()
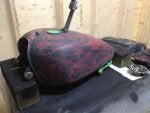
Repainting the tank (temporary):
![]()
![]()
Redone seat cover (temporary):
![]()
The bike as it stood last year before any serious mods:
![]()
As with many members on here, I figure I should document my (slow) cafe racer build and maybe get your guys opinion along the way on a few things. I love getting inspiration from others builds and a lot of the things that I do to my bike come from other great members out there.
First a little back story: For as long as I can remember I've always wanted a motorcycle, but never had the money to get one. Last year I was searching the web when this 1980 cx500 custom caught my eye. What a cool looking bike I thought. Long story short I went and picked up my first ever bike and I was so happy. Got it for $250, and knew I had lots to do, starting off with replacing the stator. (Also the PO did not have the ownership and it was an american bike....that took a while to get worked out lol) Fixed it up and it ran great after a little tuning. At that point in time i just wanted to have a bike to ride so I didn't do much to make it look pretty, but now that i have a bit of extra cash (I don't really lol) I want to get it running better and looking fantastic.
Index
Page 1: Background, front fork rebuild, front fender chop, clip-on handlebars, new exhaust wrap and mufflers, new headlight and front signals.
Page 2: New engine new temperature gauge.
Page 3: Painted engine tags and clutch cover.
Page 4: New temperature sending unit.
Page 5: Radiator guard design.
Page 6: Engine paint prep, gauge design and radiator guard fabrication.
Page 7: Dummy lights and gauge redesign
Page 8: Muffler repacking, new tachometer and speedometer, engine painting, engine guards and shock painting, frame touch-up and engine mounting.
Page 9: E-fan mounting and wiring.
Page 10: Redesigned e-fan mounting and steering limits.
Page 11: Gauge and dummy lights wiring and gauge mounting brackets fabrication.
Page 12: Gauge brackets redesign and fabrication.
Page 13: Gauge brackets painting, dummy lights mounting, gauge mounting, lights testing and carb cleaning.
Page 14: Bike startup and oil leak.
Page 15: Cylinder cover painting and test drive.
Page 17: Rim tape installation.
Page 18: Bike drawing start, LED strip testing and tank designs.
Page 19: Rear fender and licence plate holder design.
Page 20: Tank designs, rear fender redesign, bike disassembly and tire hugger design.
Page 21: Tire hugger design and brake light switch bracket fabrication.
Page 22: Battery box design and fabrication.
Page 23: Battery box fabrication and painting and rear fender support tubes fabrication.
Page 25: Rear fender support tubes and rear fender fabrication.
Page 26: Rear fender fabrication.
Page 27: Rear fender mounting bracket fabrication and start of rear fender assembly.
Page 28: Rear fender assembly, test fit and more fabrication.
Page 29: Licence plate bracket design and fabrication, final rear fender assembly, turn signal testing/concept and rear frame modifications.
Page 30: More rear light ideas.
Page 31: Rear hoop and signal mounts fabrication.
Page 32: Rear hoop fabrication continued, new shocks and signal test fit.
Page 34: Rear hoop mock-up, shock limiters, rear hoop modification, rear fender mounting bracket clean up, front electronic pan fabrication.
Page 35: Rear electrical pan fabrication, license plate bracket fabrication and rear fender test fit.
Page 36: Licence plate lights, regulator and starter solenoid mounting and wiring and rear tire hugger fabrication.
Page 39: Rear brake pad replacement, rear hub painting, frame clean up and welding in rear hoop.
Page 40: Priming and painting frame.
Page 41: Getting tire hugger and rear fender ready for painting.
Page 42: Rear fender inside coating.
Page 43: Rear fender and license plate painting, new shock spring coating, shock assemble and install and rear fender, tire hugger and turn signal mounting.
Page 45: 12 Volt time delay modules.
Page 46: Wiring and painting of rear tire hugger and electrical pans.
Page 47: Mounting tire hugger and electrical pans and wiring battery and starter solenoid.
Page 48: Cleaning up electronics and wiring rear turn signals.
Page 49: Pod filters.
Page 50: Header breather tubes and front fork stiffness modifications.
Page 51: New LED brake and running light.
Page 52: Brake flasher module.
Page 53: Brake light mounting and electronic testing.
Page 55: Tire choices.
Page 57: Disc lock.
Page 58: Final Tank designs.
Page 60: Seat pan mock up and fabrication.
Page 62: Changing tires and paint supplies.
Page 63: Tank stripping and seat upholstered.
Page 64: Priming gas tank and new ignition switch.
Page 65: Painting gas tank.
Page 67: Wet sanding tank.
Page 68: Fixing tank mistake, building ignition switch, final 2K clear coat on tank and buffing/polishing tank.
Page 69: Bike pictures and tire hugger mounting clarification.
Page 70: More bike pictures.
Anyways, here are some pictures from before:
How it looked when I bought it:
First time taking the engine out:

Repainting the tank (temporary):
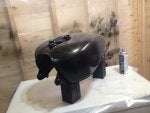
Redone seat cover (temporary):
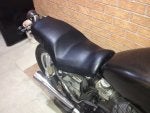
The bike as it stood last year before any serious mods:


